The WebTerm standard user interface provides access to all WebTerm functions.
For example, you can specify how WebTerm is to perform searches and how it is to display the entries it finds, or you can view comments and edit terminology.
How you use the various WebTerm user interfaces is explained in the following sections:
Starting and using the standard user interface - see here
Starting and using the simple user interface - see here
Starting and using WebTerm on a PDA - see here
Starting and using the administrator user interface (administrators only) - see "WebTerm Administration Guide".

In order that you can work with WebTerm, your computer must meet the following requirements:
Browser: Internet Explorer 5.5 - 6, Netscape Navigator 7x, Mozilla Firefox 1 or Mozilla 1.4
The correct fonts for displaying non-Western character sets (e.g. Asian, Eastern European or Arabic languages) must be installed
To start WebTerm and log in, you require the following information:
You can obtain that information from your administrator.
Starting WebTerm without logging in
Your administrator can set up WebTerm so that you can start it without logging in by one of the following methods: Direct access without logging in - you start WebTerm by entering a special URL. Starting from a portal with Single Sign-On - with the Single Sign-On option, you do not have to log into WebTerm separately if you have already logged in at that portal. Please refer to the section "Starting WebTerm without logging in" for more detailed information. |
You start WebTerm from a browser and identify yourself as an authorised user by entering your user name and password. Your log-in details determine whether you are an administrator or user and what your permissions are (see here):
2 As the web address, enter the URL given to you by your administrator.
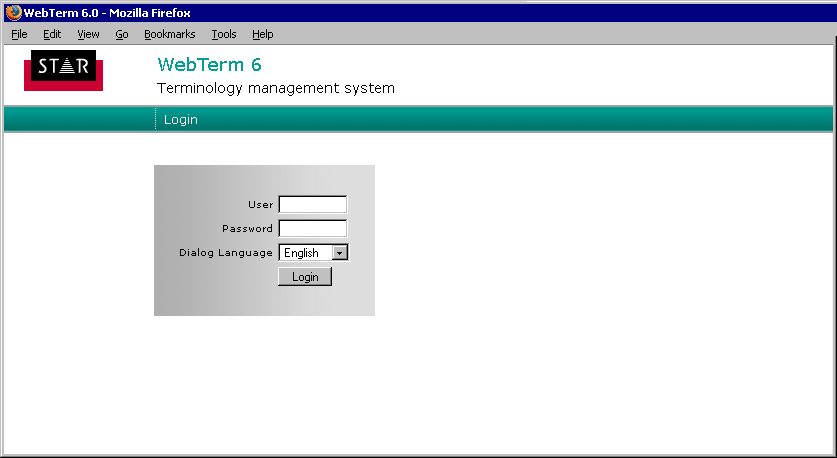
WebTerm then displays the following window:
3 Enter your user name and password respectively in the User and Password boxes.
4 From the Dialog language drop-down list, select the language in which you want the user interface to be displayed.
5 Confirm your entries by clicking the Login button.
Log-in details are case sensitive
Remember that the WebTerm log-in is case-sensitive. Make sure that you enter the details precisely as specified. |
WebTerm displays the user interface and you can start working with WebTerm immediately (see Section "The WebTerm interface").
Your user name is assigned a profile. The profile specifies the your read and write permissions, the settings that you can work with and the settings you can change. The profile is defined by the administrator (see also the section "WebTerm user permissions concept").
You must log out when you have finished working with WebTerm or want to take a long break. This is necessary to allow as many users as possible use WebTerm as the number of connections may be limited. Logging out also prevents unauthorised users working in WebTerm with your user name and making changes in your name.
1 To log out, click the Log out button on the toolbar.

WebTerm logs you out and shows the Login window again. You can log in again in this window when you want to resume your work.
Automatic log-out
WebTerm automatically logs you out if your session is inactive for longer than a specified period of time. If that happens, you have to log in again to continue working in WebTerm. |
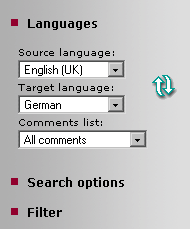
On the Settings panel, you can use menus to specify a range of settings for WebTerm to work with. For example, you can specify here which language WebTerm is to perform searches in or how WebTerm is to display the entries it finds. This allows you to customise WebTerm to suit your working method. Those menus are listed in the table below. You will find more information about them in the sections indicated.
|
Selecting dictionaries in which to search (only if you have access to multiple dictionaries, see here) |
|
|
Specifying source and target languages for the search (see here) |
|
|
Specifying the number of data records listed on the Search & Find panel (see here) |
|
WebTerm shows a square bullet next to each menu. You can use those square bullets to open and close the menus.
To open a menu, click its square bullet:
Clicking the square bullet again closes the menu; the settings you have made continue to apply, however.
You can save any changes which you have made in the Settings area. WebTerm will then automatically use the new settings the next time you log into WebTerm.
1 Click the Save settings button on the toolbar.

WebTerm displays the following message when the settings have been saved:
Settings saved!
2 Confirm the message by clicking OK .
WebTerm automatically uses the settings you have saved the next time it is started. It is not necessary to load or import the settings.
Please note that WebTerm does not save any filter settings when you click the Save button. This prevents you inadvertently performing searches whose results are limited by filter settings the next time you log in.